Most of the windows users encounter some or the other problems related to their computer. It may be hardware or software related problems. Always it is better if you could manage to troubleshoot the basic problems on their own. Here are two free software tools collection CD's recommended to have which helps you to troubleshoot problems related to hardware and software.
Hiren's BootCD : This CD has good collection of very useful tools and utilities related to backup, filesystem, antivirus, hard disk, network, tweakers, memory testing, system information, security and encryption, registry, remote accessing, data recovery, password, partition and many others. Click here to read more.
Ultimate Boot CD: This CD consists of tools related to hardware such as BIOS, hard disk, data recovery, partitioning , boot management and other hardware peripherals and other hardware related. Click here to read more.
DOS network commands
Hold the "WINDOW" key and press "R" to open RUN window. Type "cmd" and press ENTER key to open DOS command window.
ipconfig = Displays the present active network connections settings assigned by the network such as IP address, Subnet mask and Default gateway. If nothing is assigned or is not connected to network you get the message media disconnected.
Type ipconfig /? and press ENTER key at the DOS prompt to find all the parameters that can be assigned with "ipconfig" command.
net = Used to start, stop, session, statistics and view the network services.
Type net /? and press ENTER key at the DOS prompt to find all the parameters that can be assigned with "net" command.
netstat = Displays all the active connections and its listening ports and the state of the network connections whether the connection is established or not.
Type netstat /? and press ENTER key at the DOS prompt to find all the parameters that can be assigned with "netstat" command.
nbtstat = Displays all current network connections and its protocol statistics using network session layer to perform mapping of computer name to IP address.
Type nbtstat /? and press ENTER key at the DOS prompt to find all the parameters that can be assigned with "nbtstat" command.
ping = Displays the statistics of packet movement between your computer and the remote host computer. The statistics contains details of time taken by a packet of data to reach host computer from your computer and vice-versa. If the connection to the remote host computer is not accessible then you get a message "Request Timed Out".
Type ping /? and press ENTER key at the DOS prompt to find all the parameters that can be assigned with "ping" command.
tracert = Displays the path for the packet of data that has taken to reach the remote host computer or destination. By default statistics is displayed for maximum of 30 hops meaning the number of routers that a packet has passed through to reach the destination.
Type tracert /? and press ENTER key at the DOS prompt to find all the parameters that can be assigned with "tracert" command.
route = Manually a route can be added , deleted or changed in the existing route table for your active connections. You can view all the network interface list and active routing table when you use the route command as "route print".
Type route /? and press ENTER key at the DOS prompt to find all the parameters that can be assigned with "route" command.
arp = Used to add, delete, modify and display the IP address to physical address of the network adapter in the address translation table.
Type arp/? and press ENTER key at the DOS prompt to find all the parameters that can be assigned with "arp" command.
Easy way to search the web using Mozilla Firefox web browser
Generally we search the web by opening web browser and clicking on address bar and typing the web search engine URL and pressing ENTER key. Instead, there is a easy way to search the web only with keyboard using Mozilla Firefox web browser. Firefox web browser comes with integrated web search box for Google, Yahoo, Bing, Amazon.com, eBay and Wikipedia search engines where you can search the web using any of these favorite search engine. By default the web search is done using Google search engine.
 Hold the "CTRL" key and press "K" to move the cursor to the web search box and type the content to search and press ENTER key to search using Google search engine.
To search the web using other search engines, hold the "CTRL" key and press "UP" or "DOWN" arrow key to toggle between Google, Yahoo, Bing, Amazon.com, eBay and Wikipedia search engines.
Example : If you want to search a word using Google search engine, hold "CTRL" and press "K" and type the word to search and press ENTER key. Again if you want to search the same or different word using Yahoo search engine, hold "CTRL" and press "K" and use the "UP" or "DOWN" arrow key holding "CTRL" key till you see Yahoo icon on the left corner of the search box and press ENTER key.
Windows built-in keyboard shortcuts
- Windows key or Ctrl + Esc = To open windows start menu.
- F1 = To open help.
- F3 = To open search window when the cursor in on desktop.
- Windows key + F = To open search window.
- Ctrl + Shift + Esc = To open Windows Task Manager.
- Windows key + D = To minimize or maximize all opened windows to or from taskbar.
- Alt + Tab = Toggle between opened windows.
- Alt + F4 or Alt + Space Bar + C = To close the opened window.
- Alt + Space Bar + N = To minimize opened window.
- Alt + Space Bar + X = To maximize the application window.
- Alt + Space Bar + R = To restore the opened window.
- Alt + Space Bar + M = To move the opened window on the desktop.
- Shift + F10 = To open right-click menu options.
- Windows key + R and type "explore" and press Enter key = To open Windows Explorer.
- Windows key + R and type "Notepad" and press Enter key = To open Notepad.
- Windows key + R and type "Write" and press Enter key = To open Wordpad.
- Windows key + R and type "explore" and press Enter key = To open Windows Explorer.
- Windows key + R and type "iexplore" and press Enter key = To open Internet Explorer.
- Windows key + R and type "Winword" and press Enter key = To open Microsoft Word.
- Windows key + R and type "Excel" and press Enter key = To open Microsoft Excel.
- Windows key + R and type "Powerpnt" and press Enter key = To open Microsoft Powerpoint.
- Windows key + R and type "mspaint" and press Enter key = To open Microsoft Paint.
- Windows key + R and type "dfrg.msc" and press Enter key = To open Disk Defrag Tool.
- Windows key + R and type "calc" and press Enter key = To open Calculator.
- Windows key + R and type "cmd" and press Enter key = To open command prompt.
- Windows key + R and type "mplayer2" and press Enter key = To open Windows Media Player.
- Windows Key + Break = To open System properties.
- Windows Key + L = To lock the desktop.
- Windows Key + U = To open Utility Manager.
How to remove bad sectors from hard disk
Most people might have faced problems like CRC (Cyclic Redundany Check) or cannot open the files or programs properly. This is because the hard disk might have filled with bad sectors which makes your data unreadable or corrupt. Any data stored in bad sector is likely to be lost. Usually data spreads across the sectors of the hard disk. You get error message if you try opening a file when the data related to that particular file is stored in bad sectors. Bad sectors occur due to physical damage or magnetic head problem in the hard disk. This is an indication that the hard disk would crash soon.
The bad sectors can be recovered by Low Level formatting using DOS command utility "FDISK". You have to use Windows 98 bootable CD or DOS bootable floppy to boot the computer from DOS and type FDISK and press "ENTER" key. FDISK is a utility to create hard disk partitions and format the created partitions. It is always better to remove the bad sector filled partition and create partition again then format the partition using FDISK utility to remove bad sectors. You can use another DOS command SCANDISK to scan for bad sectors, but this command will mark the bad sector to be skipped so that no data is stored in bad sectors but the hard disk will continue having bad sectors.
Windows has built in tool to recover bad sectors. To access this tool, open "MY COMPUTER" and right-click on the drive and click on "PROPERTIES"or go to start and click on "RUN"or hold "WINDOWS" key and press "E" to open WINDOWS EXPLORER and right-click on the drive and click "PROPERTIES". Go to "TOOLS" tab and click on "CHECK NOW" under ERROR-CHECKING title to open CHECK DISK window select "SCAN FOR AND ATTEMPT RECOVERY OF BAD SECTORS".
There are many other tools available to fix or recover bad sectors. But I strongly recommend "HDD REGENERATOR" for recovering bad sectors. This tool will not skip or mark the bad sector, instead it will restore the bad sectors without changing or affecting the existing data thus making your data readable.
Mirroring or creating backup of your existing hard disk
Hard Disk Mirroring (also called as Disk Backup/Disk Cloning) is a process where you can create an exact copy of your existing primary hard disk including partitions to the new hard disk.All data including operating system, drivers, files and programs will be copied sector by sector to your new hard disk. In case if your existing primary hard disk fails you can use the mirrored hard disk to boot your computer. For mirroring a hard disk your need to have one extra hard disk with the same capacity or more. If not make sure that your new hard disk capacity should be more than the total size of all the files and programs (including all partitions) of your existing primary hard disk.
There are many tools available for disk mirroring. Almost all tools will allow you to assign partition size manually to your new hard disk while mirroring, but assigning partitions automatically by the tool is recommended. It is easy for the tool to create size of the partitions based on your existing partitions used space size.
Most popular tools are Acronis True Image, Easeus Disk Copy, HD Clone, Norton Ghost, Paragon Drive Backup and Ultimate Boot CD
How to create Windows Unattended Setup Disk
Unattended Windows Setup, as the names suggests Windows can be installed easily without user intervention. When creating unattended setup you can add as many programs you wish to be integrated along with Windows setup.Once the setup disk with is created, Windows with added programs can be installed without waiting for the user to enter all the details required during the installation process. For creating Unattended Setup Disk you should have Windows operating system CD/DVD, nLite or vLite program (to create unattended setup disk) and a empty media (CD/DVD).
Click here to find more details to create Unattended Windows Setup Disk. Or Click here for the procedure to create Unattended WindowsXP Setup Disk
Click here for the procedure to create Unattended Windows Vista Setup Disk.
Click here for the procedure to create Unattended Windows7 Setup Disk.
Computer turns off automatically
In most cases the computer turns off automatically due to hardware related issues.
- Check the power supply also called as SMPS (Switch Mode Power Supply) at the back side of the cabinet where you connect the power chord from main power board. If the power supply is overheated or the fan of the power supply is not rotating, then you have to replace the power supply.
- Check the heat sink fan placed on the processor. The fan should be rotating constantly when you switch on the computer. If not, check the heat sink fan power connection on the motherboard. Remove the fan power connection and plug it back. If still nothing happens, replace the heat sink fan. Remember to apply heat sink paste also called as heat sink compound solution between the heat sink fan and the processor in-case if you replace the fan.
- Clear all the dust occupied inside the computer. Turn off the computer and open the CPU cabinet and blow off the dust present in the cabinet and make sure that all the connections are intact before switching on the computer.
- Remove the RAM and clean it with soft cloth. Plug it back to the original position in the motherboard
- Check for any virus or spyware present in the computer by scanning with antivirus and antispyware. You can download free Avira Antivir Personal antivirus and Arovax Antispyware programs.
- There are chances of computer turning off automatically if some of your operating system files are corrupt. If so repair the operating system files using your operating system CD/DVD.
How to remove CD/DVD media struck inside CD/DVD drive
If your CD/DVD drive has a problem and not able to open the CD/DVD media struck inside the drive. No need to get panic. The procedure to remove the media is very simple.
Open "MY COMPUTER" and right-click on the CD/DVD drive and click on "EJECT" to open the tray. If this method did not open the tray, then open the tray manually by inserting a stiff thin pin which is around 2 inches or more long into the small hole as shown in the image.
 Push the pin bit inside (not too hard), so that the tray comes out a bit. Pull the tray out and remove the media and push back the tray to close it. Don't make it as a habit, you may end up with problems with the drive.
Open "MY COMPUTER" and right-click on the CD/DVD drive and click on "EJECT" to open the tray. If this method did not open the tray, then open the tray manually by inserting a stiff thin pin which is around 2 inches or more long into the small hole as shown in the image.

Delete virus or trojan from System Volume Information in WindowsXP
System Volume Information is a hidden folder. It is a part of System Restore that stores details about system restoration set points. All the partitions or drives on your computer have this folder. Follow the simple steps to delete the virus or trojan infected files located inside System Volume Information folder manually if your existing antivirus did not do the job for you.
Right-click on "MY COMPUTER" and go to "PROPERTIES" to open "SYSTEM PROPERTIES" window or go to "START" and click on "RUN" or hold "WINDOWS" key and press "R" to open RUN window and type "sysdm.cpl" and press "ENTER" key. In the "SYSTEM PROPERTIES" window select "SYSTEM RESTORE" tab and select or check the "TURN OFF SYSTEM RESTORE ON ALL DRIVES" option. You will get the confirmation window to select "YES" or "NO". Click "YES" to remove files stored in System Volume Information folder thus making your system free from virus or trojan.

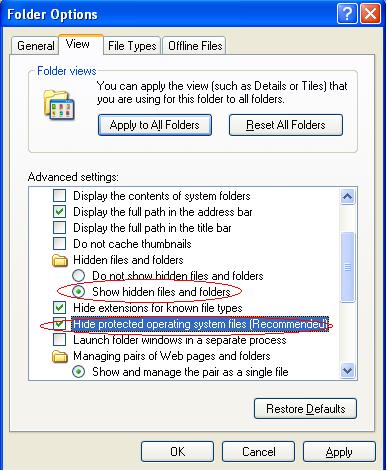
There is another way of removing virus/trojan from System Volume Information folder. Open "WINDOWS EXPLORER" by doing right-click on the "START" menu and selecting "EXPLORER" or hold the "WINDOWS" key and press "R" and type "EXPLORER" in the RUN window and press "ENTER" key. In the Windows Explorer go to "TOOLS" menu and select "FOLDER OPTIONS" to open Folder Options window. Click on "VIEW" tab. Now uncheck the "HIDE PROTECTED OPERATING SYSTEM FILES" option and make sure you have selected "SHOW HIDDEN FILES AND FOLDERS" under "HIDDEN FILES AND FOLDERS". Now you will be able to see "System Volume Information" folder in Windows Explorer..

 Manually search for the infected file and delete it. If you are not able to delete the infected file, restart the computer and first delete the infected file before opening any application or program.
Right-click on "MY COMPUTER" and go to "PROPERTIES" to open "SYSTEM PROPERTIES" window or go to "START" and click on "RUN" or hold "WINDOWS" key and press "R" to open RUN window and type "sysdm.cpl" and press "ENTER" key. In the "SYSTEM PROPERTIES" window select "SYSTEM RESTORE" tab and select or check the "TURN OFF SYSTEM RESTORE ON ALL DRIVES" option. You will get the confirmation window to select "YES" or "NO". Click "YES" to remove files stored in System Volume Information folder thus making your system free from virus or trojan.

There is another way of removing virus/trojan from System Volume Information folder. Open "WINDOWS EXPLORER" by doing right-click on the "START" menu and selecting "EXPLORER" or hold the "WINDOWS" key and press "R" and type "EXPLORER" in the RUN window and press "ENTER" key. In the Windows Explorer go to "TOOLS" menu and select "FOLDER OPTIONS" to open Folder Options window. Click on "VIEW" tab. Now uncheck the "HIDE PROTECTED OPERATING SYSTEM FILES" option and make sure you have selected "SHOW HIDDEN FILES AND FOLDERS" under "HIDDEN FILES AND FOLDERS". Now you will be able to see "System Volume Information" folder in Windows Explorer..

Cannot burn CD/DVD media using Nero burning software
Sometimes burning with Nero or any other burning software in WindowsXP will throw you an error without burning data to the CD/DVD media. This happens if there is hardware problem with with your CD/DVD Writer. If your CD/DVD Writer is perfect and still not able to burn the data then your WindowsXP built-in burning tool will not be allowing you to burn the data.
To resolve this issue:
Turn off your WindowsXP built-in burning tool by going to "ADMINISTRATIVE TOOLS" in the "CONTROL PANEL" or go to "START" and click on "RUN" and type "CONTROL ADMINTOOLS" and press "ENTER". Double-click on "SERVICES" and look for "IMAPI CD-BURNING COM SERVICE" in the list. Now double-click on "IMAPI CD-BURNING COM SERVICE" to open "PROPERTIES" window and select "DISABLED" in "STARTUP TYPE" drop down list. By default "STARTUP TYPE" will be manual.
Computer Acronyms
- AGP = Accelerated Graphics Port
- AMD = Advanced Micro Devices
- ASCII = American Standard Code for Information Interchange
- ATX = Advanced Technology Extended
- ADSL = Asymmetric Digital Subscriber Line
- BIOS = Basic Input Output System
- CMOS = Complementary Metal Oxide Semiconductor
- CD = Compact Disk
- CDR = Compact Disk Recorder
- CDROM = Compact Disk Read Only Memory
- CDRW = Compact Disk Re-Writer
- CDFS = Compact Disk File System
- DPI = Dots Per Inch
- DIMM = Dual Inline Memory Module
- DSL = Digital Subscriber Line
- DVD = Digital Versatile Disk
- DVD-RAM = Digital Versatile Disk Read Access Memory
- DDR = Double Data Rate. Some times called as Double Dynamic RAM
- DRAM = Dynamic Random Access Memory
- EPROM = Erasable Programmable Read Only Memory
- EEPROM = Electrically Erasable Programmable Read Only Memory
- FTP = File Transfer Protocol
- FDD = Floppy Disk Drive
- FDC = Floppy Disk Controller
- FSB = Front Side Bus
- FAT = File Allocation Table
- HDD = Hard Disk Drive
- IP = Internet Protocol
- IDE = Integrated Drive Electronics
- IRQ = Interrupt Request
- Kbps = Kilobytes Per Second
- LAN = Local Area Network
- LCD = Liquid Crystal Display
- LED = Light Emitting Diode
- MMX = Multi Media Extensions
- MAC = Media Access Control
- Mhz = Mega Hertz
- Mbps = Megabytes Per Second
- MAN = Metropolitan Area Network
- NIC = Network Interface Card
- NTFS = New Technology File System
- OEM = Original Equipment Manufacturer
- POST = Power On Self Test
- PnP = Plug n Play
- PCB = Printed Circuit Board
- PCI = Parallel Communication Interface
- ROM = Read Only Memory
- RAID = Redundant Array of Inexpensive Disks
- RDRAM = Rambus Dynamic Random Access Memory
- SDRAM = Synchronous Dynamic Random Access Memory
- SVGA = Super Video Graphics Array
- SCSI = Small Computer System Interface
- SATA = Serial Advanced Technology Attachment
- TCP = Transmission Control Protocol
- VGA = Video Graphics Array
- VPN = Virtual Private Networking
- WAN = Wide Area Network
- XMS = Extended Memory Specification
- XT = Extended Technology
How to increase virtual memory?
If your computer is slow and working on high resolution softwares like Corel Draw or Photoshop or any other programs, you would have come across a message "Your virtual memory is very low" popping up on the taskbar making your computer very slow and getting freezed.
Virtual memory also called as paging file or swap file is the computer's secondary memory which is used by your operating system to act as primary memory (physical RAM). If your computer needs more memory to run the applications, the operating system will assign some portion of the hard disk space to act as primary memory.
The paging file is stored in the hard disk. It is a hidden file which your operating system suses to store data that cannot fit into the primary memory.
The paging size should be 1.5 times of the actual physical RAM size (150% of your actual RAM size). Increasing the paging file size to more than 150% of the actual RAM size does not make any difference. To increase the speed of your computer you have to increase the size of your physical memory (RAM).
To increase the virtual memory "RIGHT-CLICK" on "MY COMPUTER" and click on "PROPERTIES". Go to "ADVANCED" tab and click on "SETTINGS" under performance title. In the performance options window click on "ADVANCED" tab and click on "CHANGE" under virtual memory title. Under the custom size set the initial size value to 10 to 15% and maximum value to 150% of the physical RAM or you can enter 150% of the physical RAM value to both (initial and maximum) and click on "SET" and push "OK" button.
How to speedup your computer?
Definitely, frustration will be more when your computer is very slow and if you are not able to open your files or programs quickly. Here are few tips to make your computer run faster.
(1) Increase the RAM size to higher capacity. Assuming if you have 512MB of RAM increase the size to 1GB or more. But before increasing the RAM make sure to confirm the maximum RAM size supported by your motherboard.
(2) Remove unnecessary programs placed in the taskbar.
 These icons can also be referred as programs eat up your RAM continuously making your computer slow. To remove these icons go to "START" and click on "RUN" or hold the "WINDOWS" key and press "R" to open the "RUN" window and type "MSCONFIG" and click "OK" or press "ENTER" key to open SYSTEM CONFIGURATION UTILITY.
 Uncheck unnecessary services and startup programs from the list and press "OK". This tool will ask you to restart the computer to apply changes.
(3) Hard disk defragmentation is very important to increase the speedy access to your files and programs. Disk defragmentation is a long, time consuming and tedious process. Working on files like deleting, accessing and making changes makes them distributed across different physical locations on the hard disk. Windows has a built-in "DISK DEFRAGMENTER" tool that helps in keeping the files information in an order for easy and quick access. To open the built-in disk defragment tool, go to "START" and click on "RUN" or hold the "WINDOWS" key and press "R" to open "RUN" window. Type "dfrg.msc" and press "ENTER" key. or go to "START" and click on "PROGRAMS" - "ACCESSORIES"- "SYSTEM TOOLS" - "DISK DEFRAGMENTER"
(4) Accessing programs and files will be slow if your files are infected by virus and spywares/trojans. There are many good antivirus softwares available for good price. Free antivirus like Avira AntiVir Personal for home users is capable of detecting most of the viruses provided the antivirus database has to be updated regularly. Arovax Antispyware is a tool for removing infected spywares from your computer. This tool will scan for infected spywares in the registry at the beginning when you get your windows desktop screen.
(5) If your hard disk has problem with bad sectors or with the internal hard disk head reading, it takes lot of time to open files and programs. Chances are more that you cannot read or open your files if its information is stored in the bad sector of your hard disk.
(1) Increase the RAM size to higher capacity. Assuming if you have 512MB of RAM increase the size to 1GB or more. But before increasing the RAM make sure to confirm the maximum RAM size supported by your motherboard.
(2) Remove unnecessary programs placed in the taskbar.

(3) Hard disk defragmentation is very important to increase the speedy access to your files and programs. Disk defragmentation is a long, time consuming and tedious process. Working on files like deleting, accessing and making changes makes them distributed across different physical locations on the hard disk. Windows has a built-in "DISK DEFRAGMENTER" tool that helps in keeping the files information in an order for easy and quick access. To open the built-in disk defragment tool, go to "START" and click on "RUN" or hold the "WINDOWS" key and press "R" to open "RUN" window. Type "dfrg.msc" and press "ENTER" key. or go to "START" and click on "PROGRAMS" - "ACCESSORIES"- "SYSTEM TOOLS" - "DISK DEFRAGMENTER"
(4) Accessing programs and files will be slow if your files are infected by virus and spywares/trojans. There are many good antivirus softwares available for good price. Free antivirus like Avira AntiVir Personal for home users is capable of detecting most of the viruses provided the antivirus database has to be updated regularly. Arovax Antispyware is a tool for removing infected spywares from your computer. This tool will scan for infected spywares in the registry at the beginning when you get your windows desktop screen.
(5) If your hard disk has problem with bad sectors or with the internal hard disk head reading, it takes lot of time to open files and programs. Chances are more that you cannot read or open your files if its information is stored in the bad sector of your hard disk.
No display or monitor goes blank
Can't see anything on the monitor? The major reasons are:
 Bad capacitors with the same value can be replaced at the computer service station. If all the capacitors are fine, then there will be problem with either onboard video port or with your PCI/AGP external card.
- Check for the power connection. If the power button of the monitor is either green or orange then your monitor is perfect. If not, either the main power board or the power chord will have the problem. Try connecting the monitor to other main power socket or change the power chord.
- Check for any loose connections between the main power board and the monitor. Remove the power chord and plug it back properly to the main power supply and the monitor.
- Check out your RAM. Your monitor goes blank if you have problem with the RAM. Remove the RAM and gently rub the copper portion on either side of the RAM (the side where you fix the RAM to the RAM slot) with a soft cloth or pencil eraser and plug it back to the motherboard. If this method did not do the trick, then you have to purchase new RAM.
- Monitor goes blank if you have a faulty video graphic port/card. Sometimes you see junk characters on the monitor when you switch on your computer. If your onboard video port is problem, then install new PCI/AGP external video card for the display.
- If your motherboard otherwise called as main board has the problem your monitor goes blank. Check out in the motherboard for failed capacitors. If you are looking at the motherboard from the top view, good capacitors will be flat on the top. Whereas bad capacitors will be bulged or opened up on the top as shown in the image.

How to register .dll files manually
Programs when installing cannot register some .dll files automatically into the registry. Getting these .dll files registered is mandatory for the program or software to work properly.
 Click on the "VERSION" tab. In the Item Name window if you see "OleSelf Register" then the file can be self registered manually or else it is not possible. Now copy the .dll file to C:\Windows\System32 folder. Then select "START" button and click on "RUN"or hold the "WINDOWS" key and press "R" to open
RUN window and type "regsvr32 C:\Windows\System32\<filename>.dll and press "ENTER". Finally you will get the message that your .dll file has been registered successfully as shown below.

To resolve this issue:
You have to manually register those .dll files into the registry which were not able to register automatically. To identify whether the .dll files can be self registered or not, RIGHT-CLICK on the particular .dll file and click on the PROPERTIES option. You will see two tabs as shown in the image below.
RUN window and type "regsvr32 C:\Windows\System32\<filename>.dll and press "ENTER". Finally you will get the message that your .dll file has been registered successfully as shown below.

Long beep sound when computer is switched on
If you are getting long beep sound continuously when you switch on your computer and not able to see the display on the monitor, chances are more that the RAM (Random Access Memory) is not fixed properly into the RAM slot or RAM itself will be having the problem or if you have installed any new hardware in the PCI or AGP slot of the motherboard.
Remember always to turn off the computer before you make any hardware changes.
To resolve this issue:
- If you have fixed any new hardware in the PCI or AGP slot, make sure that they are fixed properly. If fixed properly then, the newly installed hardware is not compatible with your motherboard.
- Check whether the RAM is placed and fixed properly. If still the problem persists, remove the RAM from the motherboard and take a pencil eraser or a soft cloth and gently rub on the copper portion on either side of the RAM (the side where you fix the RAM to the RAM slot on the motherboard) and fix it back and switch on the computer. Chances are more that your computer starts booting without problem. But remember this method cannot guarantee that it will always work.
- If your RAM is dead and when purchasing a new RAM, make sure that your motherboard supports the new RAM. If you are not sure the type of RAM to purchase, tell the vendor your motherboard brand and the model no. It will make him easy to recognize the type of RAM which supports your motherboard.
Remember always to turn off the computer before you make any hardware changes.
Computer restarts or hangs
There are many reasons for computer getting restarted frequently. Four major problems are either the operating system files are corrupt or the problem with the RAM or with any new installed hardware or with the heat sink fan.
To resolve this:
- Remove any newly installed hardware if any, because your computer may not be compatible with the installed hardware. If installed hardware supports your motherboard then there will be problem with the new hardware settings.
- Remove the RAM and gently rub the copper portion on either side of the RAM (the side where you fix the RAM to the RAM slot on the motherboard) with a soft cloth or pencil eraser and plug it back to the motherboard.
- In the motherboard, checkout the heat sink fan (usually called as processor fan) placed on the processor. The fan should be rotating constantly. If the fan is failed, the processor will get overheated causing your computer to get restarted automatically. There are also chances of your computer getting hanged.
- The other possibility is, the SMPS (Switch Mode Power Supply) otherwise called as power supply may have the problem. Checkout whether the SMPS fan is rotating properly or getting over heated.
- If you still face the same problem then repair your operating system files using your operating system CD/DVD.
Control Panel Keyboard Shortcuts
Go to "START" and click on "RUN" or hold the "WINDOWS" key and press "R" and type the shortcut commands.
appwiz.cpl = Opens Add/Remove Program window
devmgmt.msc = Opens Device Manger window
ncpa.cpl = Opens Network Connections window
netsetup.cpl = Opens Network Setup Wizard window
nusrmgr.cpl = Opens User Accounts window
timedate.cpl = Opens Date and Tie Properties window
mmsys.cpl = Opens Sound and Audio Devices Properties window
hdwwiz.cpl = Opens Add Hardware Device window
sysdm.cpl = Opens System Properties window
desk.cpl = Opens Display Properties window
firewall.cpl = Opens Windows Firewall window
access.cpl = Opens Accessibility Options window
wscui.cpl = Opens Windows Security Center window
wuaucpl.cpl = Opens Automatic Updates window
joy.cpl = Opens Games Controllers window
inetcpl.cpl = Opens Internet Properties window
main.cpl keyboard = Opens Keyboard Properties window
main.cpl = Opens Mouse Properties window
telephon.cpl = Opens Telephone and Modem Properties window
powercfg.cpl = Opens Power Options Properties window
Control printers = Opens Printers and Faxes window
intl.cpl = Opens Regional and Language Options window
control schedtasks = Opens Scheduled Tasks window
To open Control Panel, type "CONTROL" in "RUN" window and press "ENTER" key.
Date and Time Error
Every time when your computer is switched on, you get the error message "Incorrect Date and Time" press "DEL" to enter setup. Some computers will ask you to press "F2" to run setup. It depends on the type of motherboard you use. Since many motherboard manufacturers use different kinds of BIOS integrated to their motherboard. BIOS(Basic Input Output System) is the one which holds all the hardware information of your computer including date and time. It is better not to make any changes with the hardware settings unless you have very good knowledge about configuring BIOS. Chances are more that your computer may not boot if any wrong settings are done in BIOS.
To resolve "Date and Time" error:
- Turn off your computer completely. Remove the CPU cabinet and replace the cell/battery (generally used for calculators) placed in the motherboard (also called as main board) with the new cell/battery. This battery helps the BIOS to save any changes made. If the battery life has come down or is dead, any changes made in the BIOS will not be saved.
- After fixing the battery, turn on the computer and press "DEL" or "F2" depending on your computer and change the system date and time. Usually, all motherboards have date and time settings on the first screen on the BIOS. Keys used for changing the values are shown in the status bar of the BIOS screen. After making changes press "F10" or search for "SAVE AND EXIT" option in the menu to save the changes.
Subscribe to:
Posts (Atom)