How to build a desktop computer (part 5)

Once all the hardware peripherals are connected to cabinet, the most important and final part of assembling computer is providing proper power connection to the motherboard and other hardware peripherals.

Power connections from SMPS to motherboard and other hardware peripherals is very crucial. The 20 or 24 pin power connector and one 4 pin power connector which comes from SMPS has to be fixed to motherboard. 
Both 20 or 24 pin and 4 pin power connectors have a lock.
Not all motherboards have 24 pin power connector. Some motherboards will have only 20 pin power connectors. 
Look for the 20 or 24 pin power connector on the motherboard and connect the 20 or 24 pin power connector from SMPS to motherboard as shown in the below image.
Now connect the 4 pin power connector from SMPS  to the 4 pin connector of the motherboard as shown in the image.
Note that some older motherboard will not have the option of providing 4 pin power connector.

All CPU cabinets will have a set of cables or wires such as power, reset, hard disk LED and power LED, speaker, USB and sound which has to be connected to motherboard.
The USB and sound cables are provided only if you have a provision for connecting USB devices and sound from the front of your cabinet.

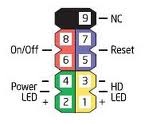
Look for the name F_PANEL or FRONT PANEL or PANEL1 on the motherboard. All motherboard manufacturers name the front panel connections differently.
The F_PANEL is a 10 pin connector.
In the F_PANEL you find some times RST for reset, ON/OFF or PWR_BTN or PWR_SWITCH or PW for power, SPK or SPEAKER for speaker, HDD_LED or HD_LED or HLED or HD for hard disk drive LED, POWER_LED or POW_LED or PWR_LED for power LED.

Usually in 10 pin front panel power connector you will find only 9 pins as shown in the above image. The 9th pin as shown in the above image should be always free. Meaning you should not connect able wire or cable to the 9th pin. The two pins next to the block without pin is for power connection and the two pins just opposite to two power pins is for reset and two pins next to reset is for hard disk drive LED and two pins opposite to hard disk drive LED is for power LED. Not all motherboard manufacturers will have the above said front panel power connections design. Always refer motherboard manual for the power connections.

After all the power connections to the motherboard is over cross check once again with the motherboard manual for front panel connections. Then plug the power chord from SMPS to the main power supply.

How to build a desktop computer (part 4)


After fixing motherboard along with processor and SMPS to ATX cabinet, next step is to fix or install RAM (Random Access Memory), hard disk drive and CDROM-RW/DVD-RW/COMBO DRIVE to the cabinet.

RAM (DDR1 or DDR2 or DDR3) depends on the motherboard you have purchased. Some motherboard supports DDR1 RAM and some support DDR2 or DDR3. Make sure that you check with your hardware vendor for the supported RAM to the purchased motherboard. DDR1 and DDR2 can be distinguished as shown in the below image.
Take the RAM and place it on the motherboard in the RAM slot 
as shown in the image
Make sure that when placing RAM in RAM slot the distance between either side of the notch on the motherboard has to match that of RAM.
After placing RAM in the slot, press firmly towards motherboard to get locked by the RAM lock
Below image shows the difference between the RAM which is locked and unlocked.
After RAM is fixed, take the hard disk drive and CDROM-RW/DVD-RW/COMBO DRIVE and fix them to cabinet as shown in the image.

The New Face of Google Web Fonts

As we talked about at our Google IO session, the Google Web Fonts team has been hard at work designing a new font browsing experience for www.google.com/webfonts. Today, this new interface is available for you to try! Just click here, or you can click the New Version link at the top of our current product. The interface has a lot of the features you've requested, including the ability to preview your own custom text, the ability to compare fonts side-by-side, as well as an indication of page load times.


To arrive at the final design, our team spent significant time researching how users pick which fonts to use on your web pages, blogs and projects. Based on our findings, we sketched out dozens of possible ways to design our font browsing experience. After many iterations of testing with our test users, we believe we've arrived at a font browsing experience you'll really like.

Our primary goal with this new interface is to ensure that as the library of free, open source web fonts grows, you can still browse the library quickly and easily. To accomplish this goal, we've introduced the concept of a collection, which is similar to the concept of a shopping cart on your favorite ecommerce website. Just add fonts to your collection, and then proceed through the Choose, Review and Use steps. During this process, you can compare them side by side, experience with them in sample layouts using the new Test Drive feature, and finally copy and paste the HTML snippet to use these fonts in your pages.

During our user studies, we noticed that when users proceeded to select a font, they have a certain use case in mind. In other words, they knew they were looking for a font for a logo, for a heading or for body text. So we designed 3 different viewing modes - Word, Sentence and Paragraph - to facilitate font browsing in each of these cases. By default, you are in Sentence mode, which shows about a sentence length of preview text. But when you switch to Word mode, the font preview size increases, and the font cards shrink so you can see more fonts on the screen. When you switch to Paragraph mode, the text size will shrink significantly, and you'll see the fonts used in sample paragraphs instead.


Second, the new interface allows for easy font browsing by weight. Just use the thickness filter in the left hand panel. Looking for an Ultra black font? How about Ultra Light? Look no further. This feature relies on the font technology of TypeDNA. The Google Web Fonts are analyzed to determine each font's specific boldness characteristic. In this way, you see a consistent level of boldness across the fonts in your filter, regardless of how the font designer originally categorized them.

The new interface introduces the Test Drive module, which allows users to visualize their font collection in a sample layout. In this way, you can see what your fonts look like in practice, before embedding them in the final product. To take your fonts for a test drive, click on the Test Drive tab from within the Review step.

And finally, the new interface has a final step, Use. Here you'll find an indication of page load time based on your font selections. It's important to remember that the more fonts you use on your page, the more font data needs to be downloaded before your users can use your pages. Although Google Web Fonts is highly optimized to serve web fonts quickly to any user in the world, it's always important to request only the font families and styles you intend to use on your pages.


Sometime in the next few weeks, this interface will replace the current homepage at www.google.com/webfonts. But until then you can give it a spin and let us know what you think.

Posted by Jeremie Lenfant-Engelmann, Engineer, Google Web Fonts

How to build a desktop computer (part 3)


Take the CPU ATX cabinet and place it horizontally on the soft floor as shown in the image.
Take the SMPS (Power Supply) and place it in the cabinet as shown in the image. 
 The SMPS has to be fixed with screws provided along with ATX cabinet at the back side of the cabinet.
After fixing the SMPS, take the motherboard and place it in cabinet such a way that all ports (keyboard, mouse, USB, Printer, sound, etc) are placed at the small rectangle opening  at the back side of the cabinet. That is the motherboard has to be placed just below the SMPS.
Now the motherboard has to be fixed to the cabinet using screws as shown below.
There are small holes provided in the motherboard for fixing the motherboard to the cabinet with the help of screws. After fixing the motherboard screws make sure your motherboard is not shaking.

Note: Do not screw the motherboard to the cabinet too hard or too tight. Because there are chances that backside of the motherboard getting contact with the metal portion of the cabinet making your computer getting restarted very frequently.

How to build a desktop computer (part 2)


Fixing processor in processor socket on the motherboard
Take the motherboard and place on any soft surface such as cardboard. All new motherboards have a plastic cover placed on processor socket.
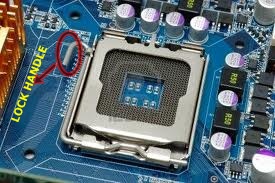
Release the lock handle to open the lid of processor socket.
Now remove the plastic cover fixed to lid. After removing the plastic cover the processor socket has to look like this.
Now we have to place the processor in processor socket
 
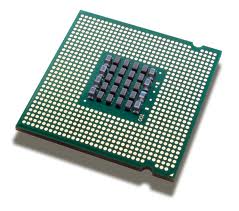
Most of the recent processors come without pins. Handling the processor is very delicate. Do not hold or put your fingers in the middle of the processor. Hold the processor as shown in the image
Always remember the portion which has the name and the speed of the processor (For example: Intel Dual Core 2.8 Ghz) must be on top. Look at the sides of the processor where you can see small cuttings on both the sides.
You have to look for the same small notches on the motherboard and place the processor properly.
Now close the lid and press the lock handle down and fix it to lock the processor to the motherboard. Make sure that your processor is placed properly in the motherboard processor socket before locking the lid.

Processor fan will have four locking clips which have to be fixed to the motherboard.
On the motherboard you can see four small holes present around the processor socket. Place the processor fan on the top of the processor and push the four locking clips one by one to the holes present in the motherboard to firmly lock the processor fan. If the locking clip is not firmly fixed then remove the locking clip by rotating anti clock wise. You can see a directional image on the locking clip to lock and unlock.
Processor fan comes along with four pin power supply wire.
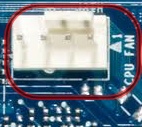
After fixing the processor fan, you have to plug the processor fan power supply wire to the motherboard for proper running of the fan. Look in the motherboard for the name " CPU_FAN " or  " CPU FAN " near to the surrounding area of the processor socket.
You have to plug the processor fan four pin power supply wire to the port called  " CPU_FAN " or " CPU FAN " on the motherboard.

How to build a desktop computer (part 1)


Assembling a computer is very easy provided need to be bit careful while giving power connections and fixing peripherals to the motherboard. I will explain in detail how to assemble a desktop computer.

REQUIREMENTS :

(1) MOTHERBOARD
You can choose INTEL, GIGABYTE, ASUS, MSI and many more depending on motherboard features and obviously your money limit). I personally recommend INTEL
motherboard.

(2) PROCESSOR
Processors depends on the speed (Example: 2.8Ghz (Giga Hertz), 3 Ghz, etc). You have INTEL and AMD processors available in the market. I recommend if you are looking only for gaming purpose, you can choose AMD. Please note that when purchasing processor, whether INTEL or AMD make sure with the vendor that the processor supports the motherboard which you are planning to purchase.

(3) RAM (RANDOM ACCESS MEMORY)
RAM is available in different types like SDRAM, DDR1, DDR2, DDR3. Some motherboards support only DDR1 and some DDR2 or DDR3. So make sure that the RAM you purchase supports the motherboard.

(4) CDROM /DVD-RW /COMBO DRIVE
Many brands are available such as LG, SAMSUNG, LITEON etc.

(5) HDD (HARD DISK DRIVE)
Many brands are available such as SEAGATE, SAMSUNG, WESTERN DIGITAL etc. There are two types of HDD available. They are IDE HDD and SATA HDD which can be fixed inside cabinet.

(6) ATX CABINET
Cabinet is a metal or metal coated box where you fix motherboard and all other peripherals related to computer.

(7) SMPS (SWITCH MODE POWER SUPPLY)
SMPS is the power supply where you connect the computer from main power supply using power chord.

(8) MONITOR
This is an output device available as two types. One is CRT and the other is LCD. CRT monitor is heavy when compared to LCD monitor.

Note: Always remember to check with vendor for compatibility and support of any hardware peripherals with motherboard you purchase.

Cannot open BIOS for changing the settings

If you want to install operating system through bootable operating system CD/DVD and you are not able to make any changes in BIOS like changing the first boot sequence to CD/DVD drive, then you have to first clear or reset the BIOS settings to factory default and make any changes you desire.

Procedure:
Switch of the computer. Open the CPU cabinet and look for the battery placed on the motherboard. 
 Remove the battery and switch on the computer. Now you should be able to see " CMOS ERROR " press F2 or F10 or DEL to enter BIOS. The error message varies depending on the manufacturers of the motherboard and BIOS. Switch off the computer now and put the battery back to motherboard and switch on the computer and press F2 or F10 or DEL to enter BIOS depending on your BIOS manufacturers. You should now be able to make any changes to BIOS. Remember, any changes made to the BIOS will not be saved if there is no battery placed on the motherboard.

How to repair corrupted system files in Windows XP


There are numerous ways to fix corrupted system files in Windows XP like:

Starting the computer by selecting CD/DVD drive option as first boot sequence in BIOS. Insert operating system CD/DVD into CD/DVD drive and select “ R” option to repair corrupted files during the Windows XP operating system installation.

If the operating system is already installed, then boot the operating system and insert operating system CD/DVD into CD/DVD drive. Click on START Windows XP installation and select UPGRADE instead of FULL INSTALLATIONoption and click NEXT to continue operating system installation. If FULLINSTALLATION option is selected then all existing user files and folders including operating system files and folders will be deleted. The option FULL INSTALLATION is considered as new installation of operating system.

The easiest way to repair corrupted files is to boot the already installed Windows XP operating system. First insert operating system CD/DVD into CD/DVD drive then hold the WINDOWS key and press R to open RUN window or go to START and click on RUN to open RUN window. Type " SFC /SCANNOW " without double quotes and press ENTER key to fix all corrupted files on Windows XP. SFC (SYSTEM FILE CHECKER) is a DOS command utility to check and repair system related files. There are many parameters that can be used with SFC command. For more parameters hold WINDOWS key and press R to open RUN window. Type " cmd " without double quotes and press ENTER key to open DOS window. At the command prompt type " SFC /? " without double quotes and press ENTER key.

Note: Always use original operating system CD/DVD for good and better performance. With original operating system installed, you will have many featured enabled like WINDOWS UPDATES thus making your computer fully secure from software bugs.

How to access remote computer's drives and folders from your computer through RUN window

For example if you have three computers connected to network (A, B, C) assuming A, B, C are the names of the computers and you want to access " D "drive of computer " B " from computer " A ". The procedure is

Go to START and click on RUN or hold the WINDOWS key and press R to open RUN window. Type
" \\B (computer name of computer B) or IP address of computer B\D$ " and press ENTER key. If assigned any administrator password a window will popup asking username and password of computer " B ". Enter the username and password and press ENTER key to open Drive D of computer B.
It should look like " \\B\D$ "
If you do not know the IP address of the remote computer, hold the WINDOWS key and press R to open RUN window. Type " cmd " and press ENTER key to open DOS window.  In the DOS command prompt type " ping <computer name> ". In the above example type " ping B " and press ENTER key to get the IP address of the computer " B ".
 
In the above image I am pinging the remote computer ANIL to get the IP address.

There is another way to access remote computer through WINDOWS EXPLORER. Hold the WINDOWS key and press E or hold the WINDOWS key and press R to open RUN window. Type
" explorer " and press ENTER key to open WINDOWS EXPLORER. In the ADDRESS BAR type
" \\B\D$ "

How to install SATA hard disk drive when your motherboard does not have SATA port

SATA hard disk is cheaper and has high data transfer rate compared to IDE hard disk drives. All recent motherboard has integrated SATA port whereas some older motherboards do not have SATA port.

Usually there are two types of SATA hard disk drives depending on manufacturers.
Some hard disk manufacturers do not provide power slot in the hard disk where you need SATA power cable for power supply for hard disk drive as shown in the image.
 In the first image above label 1 is for connecting SATA data cable and label 2 is for connecting SATA power cable.
In the above image power slot is readily available in the hard disk drive along with SATA power slot and a port for connecting SATA data cable, so there is no need of extra SATA power cable. You can directly plug any one power connector  which comes from SMPS to hard disk power slot.
 If you want to fix SATA hard disk drive to the motherboard which does not have SATA port you have to purchase IDE  to SATA/SATA to IDE dual convert adapter or USB to SATA/IDE cable.

IDE  to SATA/SATA to IDE dual convert adapter as shown in the image is a card which has to be fixed to the IDE slot of the motherboard. IDE slot is where you fix the IDE hard disk drive with 40 pin IDE data cable. This card does not need any drivers to be installed.
The USB to SATA/IDE cable has one SATA and one IDE port which has to be connected to USB port of the computer. When SATA or IDE hard disk connected with this cable it acts as a removable disk.